Introduction
While using Meteor in development is an easy task and deploying it on Meteor's infrastructure is a no brainer, things may start to get messy if you need to deploy it, secure it and scale it on your cloud. Especially if your customer imposes you a specific constraint on cloud sovereignty. The best way to achieve easy deployment is using the excellent Meteor Up tool. But if it fails or if you need to go a bit further in your infrastructure deployment, I recommend that you start using Docker to get familiar with this handy DevOps tool.I hope that this tutorial will lead you on the appropriate tracks.
Versions applied in this tutorial
As you may need to update this tutorial for your own DevOps use cases, here is the complete list of versions used in this tutorial:- OSX 10.10.5 as the development platform
- Ubuntu 15.04 as Docker host system
- Debian Jessie 7 with latest updates as Docker container system
- Docker 1.8.1
- Docker Registry 2
- Docker Machine 0.4.1
- Docker Compose 1.4.0
- VirtualBox 5.0.2
- Meteor 1.1.0.3
- NGinx 1.9.4-1
- NodeJS 0.10.40
- Mongo 3.0.6 - WiredTiger
Why Debian Jessie instead of Debian Wheezie? Simple, a gain of 30MB of footprint. Note that we could have set this tutorial on other even smaller Linux distributions for our Docker Images, like Alpine Linux. But as time of this writing, these smaller distributions do not offer the package required for installing Meteor (namely, MongoDB and node-fibers).
Installing the tooling
If you have never done it before install Homebrew and its plugin Caskroom.ruby -e "$(curl -fsSL https://raw.githubusercontent.com/Homebrew/install/master/install)" brew install caskroom/cask/brew-caskThen install VirtualBox and Vagrant:
brew cask install virtualbox vagrantNow install Docker and its tools:
brew install docker docker-machine docker-composeFor easing the access to VM and servers, we are using an SSH key installer:
brew install ssh-copy-idFor parsing and querying JSON produced by Docker, we are using
./jq:brew install jq
Some file structure
For differentiating the Meteor project from the DevOps project, we store our files like so:. ├── app └── dockerThe
app folder contains the root of Meteor sources and the docker
folder contains the root of DevOps sources.Create your virtual machines as Docker Machine
Create aVagrantfile that matches your production environment.
Here, we are using an Ubuntu 15.04 with Docker pre-installed.hosts = {
"dev" => "192.168.1.50",
"pre" => "192.168.1.51"
}
Vagrant.configure(2) do |config|
config.vm.box = "ubuntu/vivid64"
config.ssh.insert_key = false
hosts.each do |name, ip|
config.vm.define name do |vm|
vm.vm.hostname = "%s.example.org" % name
#vm.vm.network "private_network", ip: ip
vm.vm.network "public_network", bridge: "en0: Wi-Fi (AirPort)", ip: ip
vm.vm.provider "virtualbox" do |v|
v.name = name
end
vm.vm.provision "shell", path: "provisioning.sh"
end
end
end
I've provided 2 network configurations here. The first one is a private network leading to 2 virtual machines that are not accessible to your local network ( only your local OSX). The second bridges your local OSX network driver so that your VMs gain public access within your LAN. Note that for both of these network configurations, I've used static IPs.Before creating our virtual machine, we need to setup a
provisioning.sh:#!/bin/bash # Overriding bad Systemd default in Docker startup script sudo mkdir -p /etc/systemd/system/docker.service.d echo -e '[Service]\n# workaround to include default options\nEnvironmentFile=-/etc/default/docker\nExecStart=\nExecStart=/usr/bin/docker -d -H fd:// $DOCKER_OPTS' | sudo tee /etc/systemd/system/docker.service.d/ubuntu.conf # Set Docker daemon with the following properties: # * Daemon listen to external request and is exposed on port 2376, the default Docker port. # * Docker uses the AUFS driver for file storage. # * Daemon uses Docker's provided certification chain. # * Dameon has a generic label. # * Daemon is able to resolve DNS query using Google's DNS. echo 'DOCKER_OPTS="-H tcp://0.0.0.0:2376 -H unix:///var/run/docker.sock --storage-driver aufs --tlsverify --tlscacert /etc/docker/ca.pem --tlscert /etc/docker/server.pem --tlskey /etc/docker/server-key.pem --label provider=generic --dns 8.8.8.8 --dns 8.8.4.4"' | sudo tee /etc/default/docker sudo systemctl daemon-reload sudo systemctl restart docker # Enable Docker on server reboot sudo systemctl enable docker # Remove and clean unused packages sudo apt-get autoremove -y sudo apt-get autoclean -yNow, we are starting our virtual hosts and declare it as a Docker Machine:
vagrant up --no-provisionThroughout this terminal sessions, we need some environment variables. We store them in a
local_env.sh file that we fill step by step and source
each time we open a new terminal session:export HOST_IP_DEV='192.168.1.50' export HOST_IP_PRE='192.168.1.51' # Use preferably your FQDN (example.org) export HOST_IP_PROD='X.X.X.X'If you are using Fish like me, use the following content:
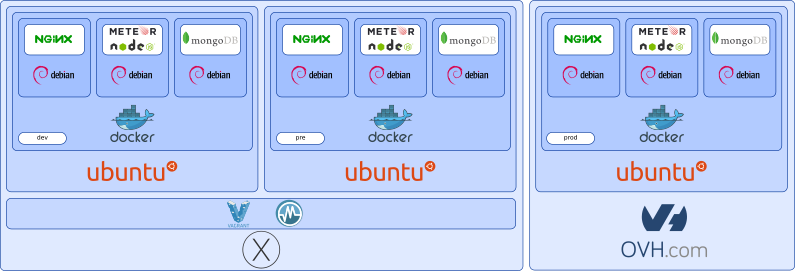
export HOST_IP_DEV='192.168.1.50' export HOST_IP_PRE='192.168.1.51' # Use preferably your FQDN (example.org) export HOST_IP_PROD='X.X.X.X'This should provide an easy access to all parts of the following network architecture:

Open 3 terminal sessions. In the first session, launch the following commands:
docker-machine -D create -d generic \
  --generic-ip-address $HOST_IP_DEV \
  --generic-ssh-user vagrant \
  --generic-ssh-key ~/.vagrant.d/insecure_private_key \
  dev
In the second session, launch the following commands:
docker-machine -D create -d generic \
  --generic-ip-address $HOST_IP_PRE \
  --generic-ssh-user vagrant \
  --generic-ssh-key ~/.vagrant.d/insecure_private_key \
  pre
Now, in the last session, wait for the 2 previous sessions to be blocked on the following repeated message
Daemon not responding yet: dial tcp XX.XX.XX.XX:2376: connection refused
and issue the following command:vagrant provision
What's going on here? Actually, the current state of Docker for Ubuntu 15.04 doesn't supportIn this last section, we will finish our configuration of our development and pre-production hosts by installing Docker Machine and securing their open ports with simple firewall rules. The script that we are using is namedDOCKER_OPTS. This is due to the transition in Ubuntu from upstart to Systemd. Plus, when we are creating our Docker Machine in our local OSX, Docker Machine re-install Docker on the host. Thus, we end up with a screwed installation on the host unable to speak to the outside world (leading to the messageDaemon not responding yet: dial tcp XX.XX.XX.XX:2376: connection refused). Basically, the vagrant provisioning script patches both vagrant virtual servers. You can reuse the content of this script on your production server when you create the associated Docker Machine. For this, you can use the following command:
ssh root@$HOST_IP_PROD "bash -s" < ./provisioning.sh
postProvisioning.sh.#!/bin/bash # Install Docker Machine curl -L https://github.com/docker/machine/releases/download/v0.4.0/docker-machine_linux-amd64 | sudo tee /usr/local/bin/docker-machine > /dev/null sudo chmod u+x /usr/local/bin/docker-machine # Install Firewall sudo apt-get install -y ufw # Allow SSH sudo ufw allow ssh # Allow HTTP and WS sudo ufw allow 80/tcp # Allow HTTPS and WSS sudo ufw allow 443/tcp # Allow Docker daemon port and forwarding policy sudo ufw allow 2376/tcp sudo sed -i -e "s/^DEFAULT_FORWARD_POLICY=\"DROP\"/DEFAULT_FORWARD_POLICY=\"ACCEPT\"/" /etc/default/ufw # Enable and reload yes | sudo ufw enable sudo ufw reloadWe execute this script on both VM using simple SSH commands like so:
ssh -i ~/.vagrant.d/insecure_private_key vagrant@$HOST_IP_DEV "bash -s" < ./postProvisioning.sh
ssh -i ~/.vagrant.d/insecure_private_key vagrant@$HOST_IP_PRE "bash -s" < ./postProvisioning.sh
Now you can access your VM either via Docker, Vagrant and plain SSH. To finish our VM configuration, we are going to allow full root access to the VM without requiring to use password. For that, you need a public and a private SSH keys on your local machine. If you haven't done it before simply use the following command:
ssh-keygen -t rsaNow, using Vagrant, copy the content of your
~/.ssh/id_rsa.pub in each of the
VM's /root/.ssh/authorized_key.Reference your production host as a Docker Machine
In this example, we are using a VPS from OVH with a pre-installed Ubuntu 15.04 with Docker. These VPS starts at 2.99€ (around $3.5) per month and comes with interesting features such as Anti-DDos, real time monitoring, ...Preinstalled VPS comes with an OpenSSH access. Therefore, we will be using the generic-ssh driver for our Docker Machine just like we did for the Vagrant VM for development and pre-production. And like before, we are using 2 terminal sessions to overcome the Docker installation issue on Ubuntu 15.04.
In the first terminal session, we setup a root SSH access without password like so:
ssh-copy-id root@$HOST_IP_PROD
# Now, you should check if your key is properly copied
ssh root@$HOST_IP_PROD "cat /root/.ssh/authorized_keys"
cat ~/.ssh/id_rsa.pub
# These 2 last commands should return the exact same key
I've been tricked by some ssh-user-agent issue there. Docker wasn't reporting
any issue even in debug mode and was just exiting with a default error code.
So, be careful that your public key is exactly the same on your local machine,
your VM and your production host.
Next and still on the same terminal session, we declare our production host :docker-machine -D create -d generic \ --generic-ip-address $HOST_IP_PROD \ --generic-ssh-user root \ prodAnd on the second terminal session, when the message
Daemon not responding yet: dial tcp X.X.X.X:2376: connection refused appears
on the first session, we launch:ssh root@$HOST_IP_PROD "bash -s" < ./provisioning.shThe last remaining step consists into solidifying our security by enabling a firewall on the host and removing the old packages:
ssh root@$HOST_IP_PROD "bash -s" < ./postProvisioning.sh
Creating your own registry
Basically, what we want to achieve is micro-services oriented to stick to a multi-tiers architecture: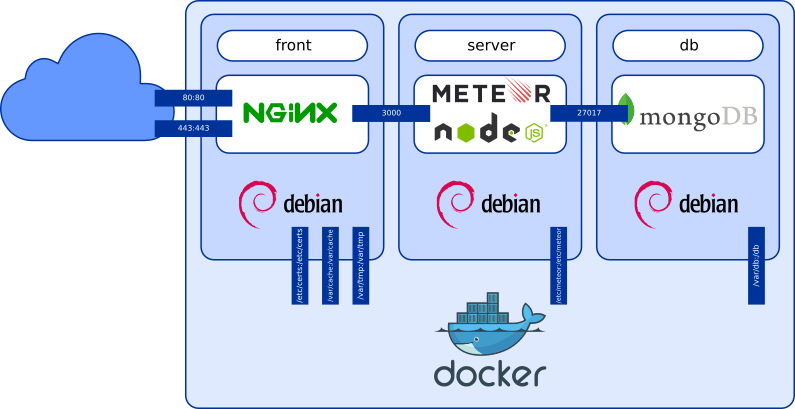
This architecture could then be spread over a Docker Swarm of multiple servers or kept on a single one. But playing with multiple containers in development is quickly a pain. We can leverage the power of Docker Compose and a local registry to fasten our development of Docker images.
In your first terminal session, activate your development Docker Machine:
eval "$(docker-machine env dev)"
# In Fish
eval (docker-machine env dev)
Create a Docker Compose file
registry.yml:registry:
restart: always
image: registry:2
ports:
- 5000:5000
environment:
REGISTRY_STORAGE_FILESYSTEM_ROOTDIRECTORY: /var/lib/registry
volumes:
- /var/lib/registry:/var/lib/registry
Now, we will use the development Docker Machine as our local registry:ssh root@$HOST_IP_DEV "mkdir /var/lib/registry" docker-compose -f registry.yml up -dFor making it visible to our preproduction VM, we need to update our default firewall rules:
ssh root@$HOST_IP_DEV ufw allow 5000Now we are editing our
/etc/default/docker configuration file for adding this
insecure registry in both our development and preproduction VM with this new
flag:# On 192.168.1.50 & 192.168.1.51, in /etc/default/docker, we add in DOCKER_OPTS: --insecure-registry 192.168.1.50:5000We need to restart our Docker daemon and restart the Docker registry on the development VM:
ssh root@$HOST_IP_DEV systemctl restart docker
ssh root@$HOST_IP_PRE systemctl restart docker
eval "$(docker-machine env dev)"
Our final step in the registry management is to login your preproduction VM and your production server to Docker Hub using your Docker credential.
eval "$(docker-machine env pre)"
docker login
eval "$(docker-machine env prod)"
docker login
Note that our registry isn't published outside our LAN. This makes it unusable for our production host. This development chain uses Docker Hub for publishing your images. Exposing this private registry to the outside world would require some additional configurations to tighten its security and server with a publicly exposed IP. While you could solely rely on Docker Hub for publishing your images, pushing and pulling to the outside world of your LAN are lengthy operations though lighten since Docker 1.6 and Docker Registry 2.
Building Mongo
Ourmongo/Dockerfile is based on Mongo's official one. It adds to the
picture the configuration of small ReplicaSet for making OPLOG available:# Based on: https://github.com/docker-library/mongo/blob/d5aca073ca71a7023e0d4193bd14642c6950d454/3.0/Dockerfile FROM debian:wheezy MAINTAINER Pierre-Eric MarchandetWe need a configuration file for this Docker image to be built# Update system ENV DEBIAN_FRONTEND noninteractive RUN apt-get update && \ apt-get upgrade -y -qq --no-install-recommends && \ apt-get install -y -qq --no-install-recommends apt-utils && \ apt-get install -y -qq --no-install-recommends \ ca-certificates curl psmisc apt-utils && \ apt-get autoremove -y -qq && \ apt-get autoclean -y -qq && \ rm -rf /var/lib/apt/lists/* # Grab gosu for easy step-down from root RUN gpg --keyserver ha.pool.sks-keyservers.net --recv-keys B42F6819007F00F88E364FD4036A9C25BF357DD4 && \ curl -sS -o /usr/local/bin/gosu -L "https://github.com/tianon/gosu/releases/download/1.2/gosu-$(dpkg --print-architecture)" && \ curl -sS -o /usr/local/bin/gosu.asc -L "https://github.com/tianon/gosu/releases/download/1.2/gosu-$(dpkg --print-architecture).asc" && \ gpg --verify /usr/local/bin/gosu.asc && \ rm /usr/local/bin/gosu.asc && \ chmod +x /usr/local/bin/gosu # Install MongoDB ENV MONGO_MAJOR 3.0 ENV MONGO_VERSION 3.0.6 RUN groupadd -r mongodb && \ useradd -r -g mongodb mongodb && \ apt-key adv --keyserver ha.pool.sks-keyservers.net --recv-keys 492EAFE8CD016A07919F1D2B9ECBEC467F0CEB10 && \ echo "deb http://repo.mongodb.org/apt/debian wheezy/mongodb-org/$MONGO_MAJOR main" > /etc/apt/sources.list.d/mongodb-org.list && \ apt-get update && \ apt-get install -y -qq --no-install-recommends \ mongodb-org=$MONGO_VERSION \ mongodb-org-server=$MONGO_VERSION \ mongodb-org-shell=$MONGO_VERSION \ mongodb-org-mongos=$MONGO_VERSION \ mongodb-org-tools=$MONGO_VERSION && \ rm -rf /var/lib/apt/lists/* && \ rm -rf /var/lib/mongodb && \ mv /etc/mongod.conf /etc/mongod.conf.orig && \ apt-get autoremove -y -qq && \ apt-get autoclean -y -qq && \ rm -rf /var/lib/apt/lists/* && \ # Prepare environment for Mongo daemon: Use a Docker Volume container mkdir -p /db && chown -R mongodb:mongodb /db # Launch Mongo COPY mongod.conf /etc/mongod.conf CMD ["gosu", "mongodb", "mongod", "-f", "/etc/mongod.conf"]
mongo/mongod.conf:storage:
dbPath: "/db"
engine: "wiredTiger"
wiredTiger:
engineConfig:
cacheSizeGB: 1
collectionConfig:
blockCompressor: snappy
replication:
oplogSizeMB: 128
replSetName: "rs0"
net:
port: 27017
wireObjectCheck : false
unixDomainSocket:
enabled : true
We could build this image and run it, but I prefer using a Docker Compose file.
These file eases the process of build, run and deploys of your Docker images
acting as a project file when multiple Docker images are required to work
together for an application. Here's the minimal docker/docker-compose.yml
that we will enrich in the next steps of this tutorial:# Persistence layer: Mongo
db:
build: mongo
volumes:
- /var/db:/db
expose:
- "27017"
Before building or launching this Docker image, we need to prepare the
volume on each host that receives and persists Mongo's data:ssh root@$HOST_IP_DEV "rm -rf /var/db; mkdir /var/db; chmod go+w /var/db" ssh root@$HOST_IP_PRE "rm -rf /var/db; mkdir /var/db; chmod go+w /var/db" ssh root@$HOST_IP_PROD "rm -rf /var/db; mkdir /var/db; chmod go+w /var/db"For building our Mongo Docker image:
docker-compose build db
# Or even faster, for building and running
docker-compose up -d db
And once it's running, initialize a single instance ReplicaSet for making Oplog tailing available:
docker-compose run db mongo db:27017/admin --quiet --eval "rs.initiate(); rs.conf();"Some useful commands while developing a container:
# Access to a container in interactive mode
docker run -ti -P docker_db

# Delete all stopped containers
docker rm $(docker ps -a -q)
# Delete all images that are not being used in a running container
docker rmi $(docker images -q)
# Delete all images that failed to build (untagged images)
docker rmi $(docker images -f "dangling=true" -q)

# In Fish
# Delete all stopped containers
docker rm (docker ps -a -q)
# Delete all images that are not being used in a running container
docker rmi (docker images -q)
# Delete all images that failed to build (dangling images)
docker rmi (docker images -f "dangling=true" -q)
Building Meteor
Meteor is fairly easy to build. It's a simple NodeJS app. We start by creating ourdocker/meteor/Dockerfile:# Based on: https://github.com/joyent/docker-node/blob/master/0.10/wheezy/Dockerfile FROM debian:wheezy MAINTAINER Pierre-Eric MarchandetBefore building this Docker image, we need to prepare the volume on each host that receives its# Update system ENV DEBIAN_FRONTEND noninteractive RUN apt-get update && \ apt-get upgrade -qq -y --no-install-recommends && \ apt-get install -qq -y --no-install-recommends \ # CURL ca-certificates curl wget \ # SCM bzr git mercurial openssh-client subversion \ # Build build-essential && \ apt-get autoremove -qq -y && \ apt-get autoclean -qq -y && \ rm -rf /var/lib/apt/lists/* # Install NodeJS ENV NODE_VERSION 0.10.40 ENV NPM_VERSION 2.13.3 RUN curl -sSLO "https://nodejs.org/dist/v$NODE_VERSION/node-v$NODE_VERSION-linux-x64.tar.gz" && \ tar -xzf "node-v$NODE_VERSION-linux-x64.tar.gz" -C /usr/local --strip-components=1 && \ rm "node-v$NODE_VERSION-linux-x64.tar.gz" && \ npm install -g npm@"$NPM_VERSION" && \ npm cache clear # Add PM2 for process management and PhantomJS RUN npm install -g pm2 phantomjs # Import sources COPY bundle /app # Install Meteor's dependencies WORKDIR /app RUN (cd programs/server && npm install) # Launch application COPY startMeteor.sh /app/startMeteor.sh CMD ["./startMeteor.sh"]
settings.json used for storing your
secrets in Meteor:ssh root@$HOST_IP_DEV "mkdir /etc/meteor" ssh root@$HOST_IP_PRE "mkdir /etc/meteor" ssh root@$HOST_IP_PROD "mkdir /etc/meteor"Now copy your
settings.json files on each hosts using a regular SCP. Mine
are slightly different depending on the target where I deploy my Meteor apps.# Just an exammple, adapt it to suit your needs scp ../app/development.json root@$HOST_IP_DEV:/etc/meteor/settings.json scp ../app/development.json root@$HOST_IP_DEV:/etc/meteor/settings.json scp ../app/production.json root@$HOST_IP_DEV:/etc/meteor/settings.json
Note that we do not include our secrets, nor in our code repository by
using a .gitgignore file, nor in our Docker Images.
We import our Meteor sources using a shared script docker/buildMeteor.sh for
the Meteor container and the NGinx container:#!/bin/bash rm -rf meteor/bundle nginx/bundle cd ../app meteor build --architecture os.linux.x86_64 --directory ../docker/meteor cd - cp -R meteor/bundle nginxIn order to avoid importing too much files in our Docker image, we create a
docker/meteor/.dockerignore file which removes the parts dedicated to
the clients wich will be serverd by NGinx:bundle/README bundle/packages/*/.build* bundle/packages/*/.styl bundle/*/*.md* bundle/programs/web.browser/appOur last required file is a script
docker/meteor/startMeteor.sh for starting
Meteor with the private settings that we add as a specific volume:#!/bin/bash METEOR_SETTINGS=$(cat /etc/meteor/settings.json) pm2 start -s --no-daemon --no-vizion main.js
Note that we launch Meteor with PM2. As we will see it, it's not a mandatory step as we are using Docker's restart policy in our Docker images. However this process management utility could be used to get some metrics on NodeJS's status.For building and launching, we are extending our
/docker/docker-compose.yml file:# Application server: NodeJS (Meteor)
server:
build: meteor
environment:
MONGO_URL: "mongodb://db:27017"
MONGO_OPLOG_URL: "mongodb://db:27017/local"
PORT: 3000
ROOT_URL: "https://192.168.1.50"
volumes:
- /etc/meteor:/etc/meteor
expose:
- "3000"
For building and launching our Meteor Docker image:docker-compose up -d db server
Building NGinx
It's up to our front container to be created. Let's start with ourdocker/nginx/Dockerfile:# Based on: https://github.com/nginxinc/docker-nginx/blob/master/Dockerfile FROM debian:wheezy MAINTAINER Pierre-Eric MarchandetLike the Meteor container, we are using the same import script. This time, we remove the server part of our container using the same technic in the# Add NGinx official repository RUN apt-key adv --keyserver pgp.mit.edu --recv-keys 573BFD6B3D8FBC641079A6ABABF5BD827BD9BF62 RUN echo "deb http://nginx.org/packages/mainline/debian/ wheezy nginx" >> /etc/apt/sources.list ENV NGINX_VERSION 1.9.4-1~wheezy # Update system ENV DEBIAN_FRONTEND noninteractive RUN groupadd -r www && \ useradd -r -g www www && \ apt-get update && \ apt-get upgrade -qq -y --no-install-recommends && \ apt-get install -qq -y --no-install-recommends \ ca-certificates nginx=${NGINX_VERSION} && \ apt-get autoremove -qq -y && \ apt-get autoclean -qq -y && \ rm -rf /var/lib/apt/lists/* # Forward request and error logs to Docker log collector RUN ln -sf /dev/stdout /var/log/nginx/access.log RUN ln -sf /dev/stderr /var/log/nginx/error.log # Configuration files COPY nginx.conf /etc/nginx/nginx.conf COPY conf host-specific /etc/nginx/conf/ # Mount points for volumes RUN mkdir -p /etc/certs /var/cache/nginx /var/tmp # Source # Raw source files exposed as HTTP and HTTPS COPY raw /www/ # Project files exposed as HTTPS COPY bundle/programs/web.browser/*.js \ bundle/programs/web.browser/*.css \ bundle/programs/web.browser/packages \ bundle/programs/web.browser/app \ /www/ # Ensure proper rights on static assets RUN chown -R www:www /www /var/cache /var/tmp # Launch NGinx COPY startNginx.sh /startNginx.sh RUN chmod u+x /startNginx.sh CMD ["/startNginx.sh"]
docker/nginx/.dockerignore:bundle/README bundle/packages/*/.build* bundle/packages/*/.styl bundle/*/*.md* bundle/programs/serverFor building it, we enhance pour
docker/docker-compose.yml file:# Front layer, static file, SSL, proxy cache: NGinx
front:
build: nginx
links:
- server
environment:
# Can be: dev, pre, prod
HOST_TARGET: "dev"
volumes:
- /etc/certs:/etc/certs
- /var/cache:/var/cache
- /var/tmp:/var/tmp
ports:
- "80:80"
- "443:443"
Our NGinx requires certificates set on the hosts in /etc/certs. For the
production host, you require SSL certificates from a certificate authority
know by the browser vendors. For the development and the preproduction hosts,
we can use self signed certificate that we create on our hosts:ssh root@$HOST_IP_DEV "mkdir -p /etc/certs; openssl req -nodes -new -x509 -keyout /etc/certs/server.key -out /etc/certs/server.crt -subj '/C=FR/ST=Paris/L=Paris/CN=$HOST_IP_DEV'" ssh root@$HOST_IP_PRE "mkdir -p /etc/certs; openssl req -nodes -new -x509 -keyout /etc/certs/server.key -out /etc/certs/server.crt -subj '/C=FR/ST=Paris/L=Paris/CN=$HOST_IP_PRE'"We need 2 additional volumes exposed on each host, one for NGinx's cache and another one for NGinx temporary files:
ssh root@$HOST_IP_DEV "mkdir /var/cache; chmod go+w /var/cache; mkdir /var/tmp; chmod go+w /var/tmp"
ssh root@$HOST_IP_PRE "mkdir /var/cache; chmod go+w /var/cache; mkdir /var/tmp; chmod go+w /var/tmp"
ssh root@$HOST_IP_PROD "mkdir -p /etc/certs; mkdir /var/cache; chmod go+w /var/cache; mkdir /var/tmp; chmod go+w /var/tmp"
In our Docker Container, we have already imported the static part of our Meteor app that will be exposed through HTTPS. Our NGinx server will also act as a static file server in HTTP.Simply put your static assets in the
docker/nginx/raw
folder for that.While serving HTTP file for our Meteor application has no interest, it could be usefull to expose some static assets without protection (this is sometime required by SSL certificate provider).We now need the configuration files our front. This configuration is mostly forked and customized from HTML5's boilerplate for NGinx servers. I will not explained all of them, simply the interesting parts that Meteor and our multi hosts configuration require. Our entry points is
docker/nginx/nginx.conf.# Run as a less privileged user for security reasons.
user www www;
# How many worker threads to run;
# The maximum number of connections for Nginx is calculated by:
# max_clients = worker_processes * worker_connections
worker_processes 1;
# Maximum open file descriptors per process;
# should be > worker_connections.
worker_rlimit_nofile 8192;
events {
# When you need > 8000 * cpu_cores connections, you start optimizing your OS,
# and this is probably the point at which you hire people who are smarter than
# you, as this is *a lot* of requests.
worker_connections 8000;
}
# Default error log file
# (this is only used when you don't override error_log on a server{} level)
error_log /var/log/nginx/error.log warn;
pid /var/run/nginx.pid;
# Main configuration
http {
# Hide nginx version information.
server_tokens off;
# Proxy cache definition
proxy_cache_path /var/cache/nginx levels=1:2 keys_zone=one:8m max_size=3000m inactive=600m;
proxy_temp_path /var/tmp;
# Define the MIME types for files.
include conf/mimetypes.conf;
default_type application/octet-stream;
# Update charset_types due to updated mime.types
charset_types text/xml text/plain text/vnd.wap.wml application/x-javascript application/rss+xml text/css application/javascript application/json;
# Format to use in log files
log_format main '$remote_addr - $remote_user [$time_local] "$request" '
'$status $body_bytes_sent "$http_referer" '
'"$http_user_agent" "$http_x_forwarded_for"';
# Default log file
# (this is only used when you don't override access_log on a server{} level)
access_log /var/log/nginx/access.log main;
# How long to allow each connection to stay idle; longer values are better
# for each individual client, particularly for SSL, but means that worker
# connections are tied up longer. (Default: 65)
keepalive_timeout 20;
# Speed up file transfers by using sendfile() to copy directly
# between descriptors rather than using read()/write().
sendfile on;
# Tell Nginx not to send out partial frames; this increases throughput
# since TCP frames are filled up before being sent out. (adds TCP_CORK)
tcp_nopush on;
# GZip Compression
include conf/gzip.conf;
# Error pages redirections
error_page 404 /404.html;
error_page 500 502 503 504 /50x.html;
# HTTP server
server {
# Server name
include conf/servername.conf;
# Protocol HTTP
listen [::]:80 ipv6only=on;
listen 80;
# Static files with fallback to HTTPS redirect
include conf/staticfile-with-fallback.conf;
# Redirect non-SSL to SSL
location @fallback {
rewrite ^ https://$server_name$request_uri? permanent;
}
}
# Upstream server for the web application server and load balancing
include conf/upstream-server-and-load-balancing.conf;
# Upgrade proxy web-socket connections
include conf/websocket-upgrade.conf;
# HTTPS server
server {
# Server name
include conf/servername.conf;
# Protocols HTTPS, SSL, SPDY
listen [::]:443 ipv6only=on ssl spdy;
listen 443 ssl spdy;
# SSL configuration
include conf/ssl.conf;
# SPDY configuration
include conf/spdy.conf;
# Static files with fallback to proxy server
include conf/staticfile-with-fallback.conf;
# Proxy pass to server node with websocket upgrade
location @fallback {
include conf/proxy-pass-and-cache.conf;
}
}
}
Depending on which host launches NGinx, we need a method to set a proper
sever name. For this, we create 3 files:docker/nginx/host-specific/servername-dev.conf:sh # Server name server_name 192.168.1.50;docker/nginx/host-specific/servername-pre.conf:sh # Server name server_name 192.168.1.51;docker/nginx/host-specific/servername-prod.conf:sh # Server name (the real FQDN of your production server) server_name example.org;
@fallback function in case no file has been found.
This is declared in the docker/nginx/staticfile-with-fallback.conf:# Serve static file and use a fallback otherwise
location / {
charset utf-8;
root /www;
# Basic rules
include conf/basic.conf;
# Try static files and redirect otherwise
try_files $uri @fallback;
# Expiration rules
include conf/expires.conf;
}
In our HTTP part of our main configuration, you can see that the trafic is
redirected to HTTPS via URL rewriting technic. Our SSL configuration
docker/nginx/conf/ssl.conf uses the exposed Docker Volume /etc/certs:# SSL configuration ssl on; # SSL key paths ssl_certificate /etc/certs/server.crt; ssl_certificate_key /etc/certs/server.key; # Trusted cert must be made up of your intermediate certificate followed by root certificate # ssl_trusted_certificate /path/to/ca.crt; # Optimize SSL by caching session parameters for 10 minutes. This cuts down on the number of expensive SSL handshakes. # The handshake is the most CPU-intensive operation, and by default it is re-negotiated on every new/parallel connection. # By enabling a cache (of type "shared between all Nginx workers"), we tell the client to re-use the already negotiated state. # Further optimization can be achieved by raising keepalive_timeout, but that shouldn't be done unless you serve primarily HTTPS. ssl_session_cache shared:SSL:10m; # a 1mb cache can hold about 4000 sessions, so we can hold 40000 sessions ssl_session_timeout 1m; # Use a higher keepalive timeout to reduce the need for repeated handshakes keepalive_timeout 300; # up from 75 secs default # Protect against the BEAST and POODLE attacks by not using SSLv3 at all. If you need to support older browsers (IE6) you may need to add # SSLv3 to the list of protocols below. ssl_protocols TLSv1 TLSv1.1 TLSv1.2; # Ciphers set to best allow protection from Beast, while providing forwarding secrecy, as defined by Mozilla (Intermediate Set) # - https://wiki.mozilla.org/Security/Server_Side_TLS#Nginx ssl_ciphers ECDH+AESGCM:ECDH+AES256:ECDH+AES128:DES-CBC3-SHA:!ADH:!AECDH:!MD5; ssl_prefer_server_ciphers on; ssl_session_cache shared:SSL:10m; # OCSP stapling... ssl_stapling on; ssl_stapling_verify on; # DNS resolution on Google's DNS and DynDNS resolver 8.8.8.8 8.8.4.4 216.146.35.35 216.146.36.36 valid=60s; resolver_timeout 2s; # HSTS (HTTP Strict Transport Security) # This header tells browsers to cache the certificate for a year and to connect exclusively via HTTPS. add_header Strict-Transport-Security "max-age=31536000;"; # This version tells browsers to treat all subdomains the same as this site and to load exclusively over HTTPS #add_header Strict-Transport-Security "max-age=31536000; includeSubdomains;"; add_header X-Frame-Options DENY;We have also added SPDY to our HTTPS configuration in the
docker/nginx/conf/spdy.conf:# SPDY configuration add_header Alternate-Protocol 443:npn-spdy/3; # Adjust connection keepalive for SPDY clients: spdy_keepalive_timeout 300; # up from 180 secs default # enable SPDY header compression spdy_headers_comp 9;
HTTP/2 support is on its way. When integrated to NGinx, this configuration will be upgraded for taking advantage of it.No that SSL and SPDY are set, we can serve the static file exposed via HTTPS with the same configuration as before for HTTP. But this time, the fallback mecanism redirect the trafic to our Meteor application (our server container). If no static file is found, the trafic is send to our Meteor application using a proxy with cache:
proxy_http_version 1.1;
proxy_pass http://server;
proxy_headers_hash_max_size 1024;
proxy_headers_hash_bucket_size 128;
proxy_redirect off;
# Upgrade proxy web-socket connections
proxy_set_header Upgrade $http_upgrade; # allow websockets
proxy_set_header Connection $connection_upgrade;
proxy_set_header X-Forward-Proto http;
proxy_set_header Host $http_host;
proxy_set_header X-Real-IP $remote_addr;
proxy_set_header X-Forward-For $proxy_add_x_forwarded_for;
proxy_set_header X-Forward-Proto http;
proxy_set_header X-Nginx-Proxy true;
proxy_cache one;
proxy_cache_key prj$request_uri$scheme;
proxy_cache_bypass $http_upgrade;
# Expiration rules
if ($uri != '/') {
  expires 30d;
}
Our proxy cache needs to upgrade the HTTPS connections to WSS. This is achieved
in our docker/nginx/conf/upstream-server-and-load-balancing.conf:# Upstream server for the web application server
upstream server {
# server is included in each dynamic /etc/hosts by Docker
server server:3000;
# Load balancing could be done here, if required.
}
For directing our NGinx on the appropriate configuration, we use an
simple environment variables HOST_TARGET that can be dev, pre or
prod and a script docker/nginx/startNginx.sh for using this variable:#!/bin/bash if [ ! -f /etc/nginx/conf/servername.conf ] then ln -s /etc/nginx/conf/servername-$HOST_TARGET.conf /etc/nginx/conf/servername.conf fi nginx -g "daemon off;"Like before for the other containers, we build it and launch it with:
docker-compose up -dYou should now have a full development host.
Application logging
When launching, stopping, refreshing our services, Docker produces a log for each container that you can easily access in your CLI:docker-compose logs # Or only for the db docker-compose logs db # Or only for the server docker-compose logs server # Or only for the server and the front... docker-compose logs server front # ...As you can see it, it can start to be a bit verbose. Still, you can inspect any Docker container log with a tail like this:
$ docker ps
CONTAINER ID        IMAGE               COMMAND                  CREATED             STATUS              PORTS                                      NAMES
82a7489e41a0        docker_front        "/startNginx.sh"         4 hours ago         Up 4 hours          0.0.0.0:80->80/tcp, 0.0.0.0:443->443/tcp   docker_front_1
4b0656669213        docker_server       "./startMeteor.sh"       27 hours ago        Up 4 hours          3000/tcp                                   docker_server_1
fe6a7238328a        docker_db           "mongod -f /etc/mongo"   45 hours ago        Up 4 hours          27017/tcp                                  docker_db_1
1a878c646094        registry:2          "/bin/registry /etc/d"   46 hours ago        Up 46 hours         0.0.0.0:5000->5000/tcp                     docker_registry_1

$ docker logs --tail 4 -f docker_db_1
2015-09-03T12:20:49.298+0000 I NETWORK  [initandlisten] connection accepted from 172.17.0.64:49051 #22 (18 connections now open)
2015-09-03T12:20:49.314+0000 I NETWORK  [initandlisten] connection accepted from 172.17.0.64:49052 #23 (19 connections now open)
2015-09-03T12:20:49.315+0000 I NETWORK  [initandlisten] connection accepted from 172.17.0.64:49053 #24 (20 connections now open)
2015-09-03T16:36:13.666+0000 I QUERY    [conn10] g...
Docker logs are not regular
/var/log entries. They are specific to each ones of
your container. There's an important risk to fill up your disk pretty fast depending
on you log usages. Fortunately, since Docker 1.8, specific log driver can be added
to our running container. We are using logrotate here but you could setup a
specific server for an ELK stack
or any other of your favorite log solution. For configuring our logrotate on
each host, add a new configuration for Docker:ssh root@$HOST_IP_DEV "echo -e '/var/lib/docker/containers/*/*.log { \n rotate 7\n daily\n compress\n size=1M\n missingok\n delaycompress\n copytruncate\n}' > /etc/logrotate.d/docker"
ssh root@$HOST_IP_PRE "echo -e '/var/lib/docker/containers/*/*.log { \n rotate 7\n daily\n compress\n size=1M\n missingok\n delaycompress\n copytruncate\n}' > /etc/logrotate.d/docker"
ssh root@$HOST_IP_PROD "echo -e '/var/lib/docker/containers/*/*.log { \n rotate 7\n daily\n compress\n size=1M\n missingok\n delaycompress\n copytruncate\n}' > /etc/logrotate.d/docker"
Now, we are updating our docker/docker-compose.yml and set our Docker
containers to use the json-file log driver so that it doesn't stay buried
in /var/lib/docker/containers/[CONTAINER ID]/[CONTAINER_ID]-json.log:# Persistence layer: Mongo
db:
build: mongo
log_driver: "json-file"
volumes:
- /var/db:/db
expose:
- "27017"
# Application server: NodeJS (Meteor)
server:
build: meteor
log_driver: "json-file"
environment:
MONGO_URL: "mongodb://db:27017"
MONGO_OPLOG_URL: "mongodb://db:27017/local"
PORT: 3000
ROOT_URL: "https://192.168.1.50"
volumes:
- /etc/meteor:/etc/meteor
expose:
- "3000"
# Front layer, static file, SSL, proxy cache: NGinx
front:
build: nginx
log_driver: "json-file"
links:
- server
environment:
# Can be: dev, pre, prod
HOST_TARGET: "dev"
volumes:
- /etc/certs:/etc/certs
- /var/cache:/var/cache
- /var/tmp:/var/tmp
ports:
- "80:80"
- "443:443"
log_driver: "json-file"
For taking this new logging configuration, just issue the following commands:# This stops the current running containers docker-compose stop # This rebuild all images docker-compose build # This starts all containers docker-compose up -d
Push to your local registry
When your are satisfied with the development of your container, you can save your Docker images into your local registry for deploying them to preproduction.For Mongo:
docker tag -f docker_db $HOST_IP_DEV:5000/mongo:v1.0.0
docker push $HOST_IP_DEV:5000/mongo:v1.0.0
docker tag -f docker_db $HOST_IP_DEV:5000/mongo:latest
docker push $HOST_IP_DEV:5000/mongo:latest
For Meteor:
docker tag -f docker_server $HOST_IP_DEV:5000/meteor:v1.0.0
docker push $HOST_IP_DEV:5000/meteor:v1.0.0
docker tag -f docker_server $HOST_IP_DEV:5000/meteor:latest
docker push $HOST_IP_DEV:5000/meteor:latest
For NGinx:
docker tag -f docker_front $HOST_IP_DEV:5000/nginx:v1.0.0
docker push $HOST_IP_DEV:5000/nginx:v1.0.0
docker tag -f docker_front $HOST_IP_DEV:5000/nginx:latest
docker push $HOST_IP_DEV:5000/nginx:latest
Deployment in pre-production
For deploying to production, we are going to refactor ourdocker/docker-compose.yml
a bit to avoid repetition on Docker Compose file depending on the host that
you're tageting.We create a
docker/common.yml file which centralized value used for all hosts:# Persistence layer: Mongo
db:
build: mongo
log_driver: "json-file"
volumes:
- /var/db:/db
expose:
- "27017"
# Application server: NodeJS (Meteor)
server:
build: meteor
log_driver: "json-file"
environment:
MONGO_URL: "mongodb://db:27017"
MONGO_OPLOG_URL: "mongodb://db:27017/local"
PORT: 3000
volumes:
- /etc/meteor:/etc/meteor
expose:
- "3000"
# Front layer, static file, SSL, proxy cache: NGinx
front:
log_driver: "json-file"
build: nginx
volumes:
- /etc/certs:/etc/certs
- /var/cache:/var/cache
- /var/tmp:/var/tmp
ports:
- "80:80"
- "443:443"
Now, we can refactor our docker/docker-compose.yml to only set the remaining
Docker command required for development:# Persistence layer: Mongo
db:
extends:
file: common.yml
service: db
# Application server: NodeJS (Meteor)
server:
extends:
file: common.yml
service: server
links:
- db
environment:
ROOT_URL: "https://192.168.1.50"
# Front layer, static file, SSL, proxy cache: NGinx
front:
extends:
file: common.yml
service: front
links:
- server
environment:
# Can be: dev, pre, prod
HOST_TARGET: "dev"
Now for easing the deployment on the pre-production hosts, we are using our
common configuration in a docker/deploy-pre.yml file that ease the pull and
launch of your services:# Persistence layer: Mongo
db:
image: 192.168.1.50:5000/mongo:v1.0.0
extends:
file: common.yml
service: db
restart: always
# Application server: NodeJS (Meteor)
server:
image: 192.168.1.50:5000/meteor:v1.0.0
extends:
file: common.yml
service: server
links:
- db
environment:
ROOT_URL: "https://192.168.1.51"
restart: always
# Front layer, static file, SSL, proxy cache: NGinx
front:
image: 192.168.1.50:5000/nginx:v1.0.0
extends:
file: common.yml
service: front
links:
- server
environment:
# Can be: dev, pre, prod
HOST_TARGET: "pre"
restart: always
Connect Docker Machine to your pre-production host, start your services
and ensure that your ReplicationSet creation is applied:eval "$(docker-machine env pre)" docker-compose -f deploy-pre.yml up -d docker-compose -f deploy-pre.yml run --rm db mongo db:27017/admin --quiet --eval "rs.initiate(); rs.conf();"Once you are satisfied with you containers, it's time to make them available to your production server.
Push to Docker Hub
Now we go back on our development host for publishing these container on the public Docker Hub:eval "$(docker-machine env dev)"And we publish our containers for Mongo:
docker tag -f docker_db YOUR_DOCKER_HUB_LOGIN/mongo:v1.0.0
docker push YOUR_DOCKER_HUB_LOGIN/mongo:v1.0.0
docker tag -f docker_db YOUR_DOCKER_HUB_LOGIN/mongo:latest
docker push YOUR_DOCKER_HUB_LOGIN/mongo:latest
For Meteor:
docker tag -f docker_server YOUR_DOCKER_HUB_LOGIN/meteor:v1.0.0
docker push YOUR_DOCKER_HUB_LOGIN/meteor:v1.0.0
docker tag -f docker_server YOUR_DOCKER_HUB_LOGIN/meteor:latest
docker push YOUR_DOCKER_HUB_LOGIN/meteor:latest
For NGinx:
docker tag -f docker_front YOUR_DOCKER_HUB_LOGIN/nginx:v1.0.0
docker push YOUR_DOCKER_HUB_LOGIN/nginx:v1.0.0
docker tag -f docker_front YOUR_DOCKER_HUB_LOGIN/nginx:latest
docker push YOUR_DOCKER_HUB_LOGIN/nginx:latest
Deployment in production
Like the deployment in pre-production, we are leveraging the capabilities of Docker Compose for easing the pulling and running of Docker containers. For this, we create adocker/deploy-prod.yml file:# Persistence layer: Mongo
db:
image: YOUR_DOCKER_HUB_LOGIN/mongo:v1.0.0
extends:
file: common.yml
service: db
restart: always
# Application server: NodeJS (Meteor)
server:
image: YOUR_DOCKER_HUB_LOGIN/meteor:v1.0.0
extends:
file: common.yml
service: server
links:
- db
environment:
ROOT_URL: "https://YOUR_SITE_FQDN"
restart: always
# Front layer, static file, SSL, proxy cache: NGinx
front:
image: YOUR_DOCKER_HUB_LOGIN/nginx:v1.0.0
extends:
file: common.yml
service: front
links:
- server
environment:
# Can be: dev, pre, prod
HOST_TARGET: "prod"
restart: always
Before running everything in production, we must pull our images. Behind the
scene so that our users doesn't notice the changes, then we will stop our current
running containers, launch our new ones and finish by a ReplicaSet configuration.eval "$(docker-machine env prod)" docker-compose -f deploy-prod.yml pull docker stop "$(docker ps -a -q)" docker-compose -f deploy-prod.yml up -d docker-compose -f deploy-prod.yml run --rm db mongo db:27017/admin --quiet --eval "rs.initiate(); rs.conf();"
Links
Sources for this tutorial:Informations used for this tutorial:
- Homebrew
- Caskroom
- Easy sending your public SSH key to your remote servers
- Docker documentation
- Docker Installation on Ubuntu
- Secure Docker
- The dangers of UFW + Docker
- OpenSSL Howto
- Control and configure Docker with Systemd
- How to configure Docker on Ubuntu 15.04 (workaround)
- Ulexus/Meteor: A Docker container for Meteor
- VPS SSD at OVH
- Your Docker Hub account
- Creating a single instance MongoDB replica set for Meteor
- jq is a lightweight and flexible command-line JSON processor
- How to add environment variables to nginx.conf
- MongoDB configuration options
- MongoDB sample YAML files
- The magic of Meteor oplog tailing
- Docker: Containers for the Masses -- using Docker
- How To Create an SSL Certificate on Nginx for Ubuntu 14.04
- SSL and Meteor.js
- HTML5's boilerplate for NGinx servers